Welcome![]

Getting Started![]
This tutorial is for GIMP. If you dont have GIMP and still want to make a charart, go to Pixlr.com, or download GIMP now! Ok, now we're really getting started!
The Tools[]
These are the tools we'll be using today:
Pencil- looks just like it sounds. Used for almost everything exsept shading and highkights.
Blow Tool- It's right below the paint bucket. This should only be used for sheading and highlights.
Paint Bucket- Again, looks just like it sounds, and used for the same thing.
Filter- This isn't really a tool, it's just very important. The fliters are found above your charart, we'll only be using the Gaussian Blur.
Eraser- I perfer not to use this, but it;s the pink block to the right of the pencil. Used for mistakes only.
Blur Tool- This one looks like a rain drop next to the pointing hand. DO NOT use this for any blurring except when it is agaisnt the lineart. I'll explain later.
Smudge Tool- The pointing glove. This is used for tortis and multi-colored cats.
First Things First.[]
Now that we've covered the tools, let's begin!for our firstsolid colored charart, we'll be doing my brother Mudsplash. As you might have guessed, he's a dark brown tom with green eyes. Here are the steps to beginning. I'll show you what he should look like once you've finished.
- Ok, open GIMP (duh)
- Drag one of the short haired tom warriors templates onto your desktop.
- File, Open, and select the template.
Now, on the Toolbox, under all the tools select your color. for Mudsplash we will pick dark drown. Before you fill him in, go to the top and click Image, Mode, and RBG, otherwise your kitty will have no color!
 Ok, so after you've done that, you should have something simular to this.
- Now, select a dark green color and fill in his eyes, and for his mouth pick a dark pink or pale red.
- On the Layers, Channels, Paths, and Undo Window, Under where it says background, choose the little white peice of paper with a fold at the top. Name your New layer "Ear Pink" and make sure it's transparent.
- Then, select a color and pick a color for the ear pink. the ear pink should be a paler red color of the base pelt color. Then, click the pencil tool, and inside the ears, follow the lineart all the way in an out, and connect it.
- Now, once you done that, click the Blur tool, and still using a small brush, blur the area where the ear pink meets the head.
 Once you have done that, this should be Mudsplash.
Ok, so here's where things might start to get tricky.
- Now, Add another layer, and name this one "Shading".
- Select the Blow Tool, and make sure you are using a hard circle, size 15 and pitch black.
- Now, since these are warriors, the light sorce is the sun. So, now you color in where the shadows would be.
 Here's what it should look like now. Don't panic if yours doesn't look exactly like mine, just make sure it's shaded in those areas.
- Now, go to the top, click Filters, Blur, Gaussanian Blur, and blur the shading. You should blur it any more then 35, because then it's loose shape.
- Now, just leave it like that for now and add a new layer. This one we will name "Highlights".
- Now, still using the Blow Tool, change the color to pure white and color in where the sun would hit the most.
 I know that last step could be very confusing, so here's what her should look like one your done. Doesn't look very much like a cat now does it?
- Now, go to Gaussanian Blur, and this time blur at least to 45, otherwise the highlights will be to direct.
- After that, go to Layer's Window, and change the mode to "Overlay".
 Once you have done that, we have an almost finished Mudsplash!
- Now, go down and add another layer. Name this layer "Shading Clean Up".
- Place this layer under the base layer, and fill it in with a very bright color. I suggest Yellow or Bright Blue or Pink.
- Now, go to the shading layer, and click the erase tool.
- Start erasing the shade that went outside of the lineart.
- Once your done, save, merge layers, and you are done!
Yaay![]
I thought we'd never be done with that boring lump of fur! Now that you have learned the basics, we can move on to more challenging things.
That right!
Tabbies!!!
Tabbies[]

Making tabby charart is raising ranks in Tutorialclan! Now, for the tabbys, we wont be doing me (best im to beautiful), but we'll draw my mother, Bluestripe. she is a blue-gray she-cat with darker Y-tabby stripes and pale brown eyes. Trust me, this will be easy.
- Open our long haired female warrior image on GIMP, and select color as a light-blue gray and fill in the white.

- Now, add a new layer and nme this one Stripes.
- Choose a darker shade of her bse pelt color, and change the pencil size to circle size 3.
- Now you use the pencil and make the Y-tabby patterns.
 It should look something like this. Notice how i went out of the lines. Yes, you can do that.
- Now, go to Gaussanian Blur, and blur it only to a max of 4. anything above will ruin the quality of the stripes.
- Once you have blurred, take the eraser tool, and go along the lineart, erasing anything mess.
- After that, add ear pink, shading, highlights a Ta-da! You got Bluestripe!
Classic Tabby[]
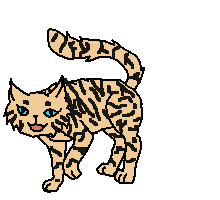
For a classic tabby, we'll be making Talonice. She's a tan she-cat with black stripes with a white underbelly. Now, get out your GIMP, and let's get started!
- Ok, so Talonice is a long haired warrior. So open that blank, and fill in the blanks.
 The color should be close to this.
- Now, new layey, and take the brush on the smallest hard brush, and add tons of stripes.
- The stripes can be a mix of dots, Y-stripes, and even marble.
 It should look busy and messy, thus making it look more natural.
- Now you blur, only to 3, erase mess, and fill in the ear pink, and open a new layer.
- Name this one "Belly Whites" and select a VERY VERY PALE GRAY sdo not use pure white!!!!!! i cannot stress this enough!
- Using the size one circle on pencil, colour in the belly white.
- Then, using the rain drop blur tool, blur along the edges on the belly where it meets the fur.
- Use the smudge tool, zig-zag along the part where the white meets the belly.
 That might have been confusing... but here is Talonice when you finished those steps.
- Finally just shade, highlight, clean up and your done!
Marble Tabby[]
There are two types on marble: wavy and triangular. It's basically the same thing as the other tabby's, but wavy should look more like this:
While triangles should be more straight: 
Torti's![]
Hey it's me Frostfoot, sadly i have to say goodbye for now. Charartstar needs me to help some kits learn the tools. But I'll be back in The Pixlr Tutorial! Im handing things off to my pal Runningheart so good luck!
...

OK, first, we'll do bi colored cats. In this case we'll do my good friend Redsplash. He's a short haired red tom with white smudges.
- Open you image on GIMP (Duh)
- We're going to do things a little bit differently, so bare with me. Now, click the color selector in the uper right hand corner of the Toolbox.
- Select the white area, then hit Ctrl + X.
- Save this as "Empty Warrior Lineart" and reopen it.
- Create a new layer named "Base" and place it under the lineart, and fill it in red.
 Ok, so if you did that correctly, your warrior should look like so.
- Im going to show you step by step in photos how to do the last parts.
 Using white, add as many patches as you want.
- Now Using thee water drop, blur like crazy.
 Using the smudge tool, zig-zag along the white to make it look natural.
- Now, go to the lineart layer and fill in the mouth and eyes (i forgot to say this earlier xD)
- Add an ear pink layer.
- Back at the base layer, make a shading layer and highlight layer like always.
- now, go though layer by layer, and erase all the mess outside the lineart.
- And there you have it! One bi colored warrior!
Look at the cats we made![]

I need to fix this one xO


